DocFX automation with GitHub Actions
Publishing a DocFX page manually each time you change it is yet another tedious step that would need to be performed during release. Recently I was releasing v1.0.0 of my Wolfringo library, and I set up automated publishing using GitHub Actions!
What is DocFX?
DocFX is a static page generator that generates HTML from Markdown files. What differentiates it from generators like Hugo or Jekyll is that it’s designed specifically for code documentation, and as such, it generates API Reference from comments in the source code of your project. Neat, huh?
DocFX promises to support multiple languages, including C#, F#, Visual Basic, REST, JavaScript, Java, Python and TypeScript
DocFX is maintained by Microsoft - in fact, I believe Microsoft Docs are also largely generated with DocFX.
What are GitHub Actions
GitHub Actions are CI/CD workflows that are integrated directly into your GitHub repository. They can be ran manually or automatically on certain events (such as push to a branch or a Pull Request being opened). If Action is triggered by a Pull Request, GitHub will automatically start the action, and will prevent merging the PR until all actions are successful (unless you’re an admin on the repository - then you can force merge).
GitHub Actions are free to use for public repositiories.
I find GitHub Actions really useful for automatically publishing websites from source, such as Hugo or DocFX projects. Publishing Hugo I deeply covered in my post about Migrating this page from Wordpress to Hugo, so let’s focus on DocFX here!
Creating a DocFX Action
There’s an existing docfx-action by nikeee, however I had an issue getting it to work with my .NET Core/.NET Standard project - I assume it’d be because that action uses Mono under the hood. After trying to get it to work for a longer while, I decided to write my own action that handles DocFX.
Requirements
I assume that you already have your DocFX files set up, and your project code ready and commented with /// comments. Writing these is a larger topic and out of scope of this blog post - if you need help, please refer to DocFX tutorials and XML documentation comments guide.
I also recommend that you work on minimum 2 branches with your project - master and dev. While this isn’t strictly required for your DocFX action to work, but working on dev and pushing to master only for release can be used to limit your documentation re-publishing to only when a release is actually ready. Plus, not working on a master branch directly is considered to be a good practice anyway.
Wolfringo - IWolfClient.cs - source code example.
Wolfringo - docs folder - documentation config and additional Markdown files.
Creating an Action file
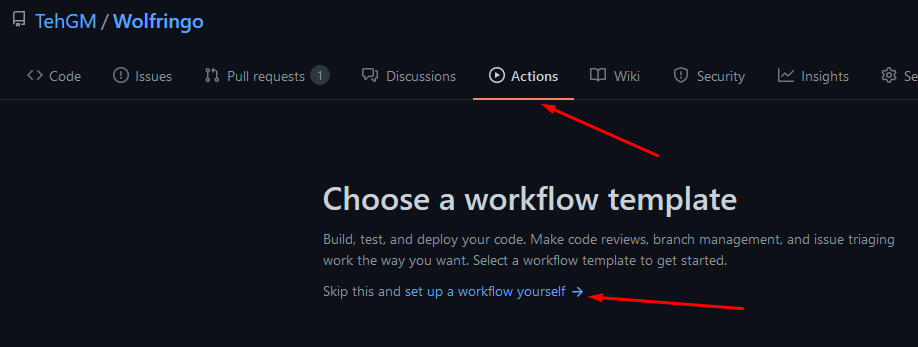
Actions are configured as .yml files, and reside in .github/workflows/ directory in your repository. You can create the file manually, but let’s use GitHub menus to create the file in a correct location for us. In your repository, press Actions button. GitHub automatically suggests some pre-defined Actions templates, but for this tutorial, let’s click set up a workflow yourself link.
GitHub will display a template for a default workflow - you are welcome to edit it, or remove everything and start fresh.
Naming your action
Your action needs a name - you can name it whatever you want, but I suggest using a name that will help you understand what the action does just from the name alone.
| |
You probably want to rename the .yml file as well:

Selecting when to run
Actions can be triggered by numerous events. In our example, we’ll enable it for pushes and Pull Requests to master branch.
| |
Of course you can use any event you want - see Events that Trigger Workflows for a list. You can also specify more branches in the array than just master.
Creating a job
GitHub Actions can have multiple jobs running in parallel, or one after another if you use needs option. For our example, we’ll use just one job - let’s name it generate-docs.
We’ll set the job to run on Windows virtual machine - this is most sure way to get it working. There could be way to run DocFX on a Linux virtual machine, but I am not sure if it’ll cause issues (due to Mono etc).
| |
Steps
GitHub Action job runs in steps, which always run one after another. This way, we can get everything installed etc before we build the page and publish it.
All steps should be inside of our job object.
| |
Step 1 - Checkout
The first step is to get all of our project code onto virtual machine. This is easy to do using predefined checkout action.
| |
Step 2 - Install .NET Core
The 2nd step is to install .NET Core, so DocFX can build our project. Luckily there is already a predefined action for that called setup-dotnet, so we don’t have to run series of commands.
This action can specify which .NET Core version to install. For this example, I chose version 3.1.101. You can pick whichever version you need with your project, or even a wildcard - refer to setup-dotnet action readme.
| |
Step 3 - Install DocFX
Next step is to install DocFX. The easiest way to install it in a Windows environment is using Chocolatey. We’re lucky again with this one - there is already an action ghaction-chocolatey created by crazy-max that makes using this package really easy to use with GitHub Actions.
| |
Step 4 - Install dependencies
Now we have all software installed. Time to install all NuGet packages that our projects use. If we don’t do this, there might be issues generating some cross-links for your automatically generated API Reference. For example, I had issues with any links to methods that take CancellationToken as one of their parameters.
To install dependencies, we simply run dotnet restore command in the step:
| |
Step 5 - Build documentation page
Now that we have everything installed and our project prepared, we can finally build our documentation HTML. To do so, we run docfx docfx.json command.
In this step, I also change working directory to docs folder. This might be not needed or the folder might be named differently depending on your project structure - just point to the folder that contains your docfx.json file.
Additionally, I also explicitly tell GitHub to not run next steps if this one fails - we don’t want to publish broken documentation website. GitHub should act this way by default, but by specifying this explicitly, we know for sure that it’ll work exactly how we want it to.
| |
Step 6 - Publish
We’re almost there. The last step is to actually publish the documentation website so it can be seen by everyone. To simplify this task, I use action actions-gh-pages by peaceiris. We tell it to publish contents of docs/_site folder (_site is default folder for DocFX - but if you changed it in docfx.json, you can change that value).
I also use force_orphan option - this will ensure that gh-pages branch has no history, and no redundant files.
An if property plays important role in this step - it ensures that this step is skipped for anything that isn’t a push to master branch. This enhances security of our documentation website by preventing anyone overwriting it by opening a Pull Request. This also ensures that documentation is only updated when changes are released to master branch - and won’t keep changing for features that are still WIP.
| |
If you want to use a custom domain, you can also add cname to with. Use your domain as the value.
View GitHub Docs for more information on using custom domains on GitHub Pages.
Saving action
Yay, we have all steps prepared. The entire action should look more or less like this:
| |
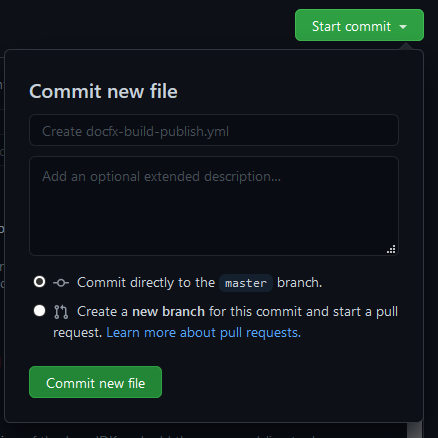
Now go ahead, and press Start commit. You can name your commit, and select whether it should be commited directly to master, or started as a pull request.
Checking the action out
Whether you commit directly or create a pull request, if you didn’t change events when selecting when to run, the action should automatically start. The only difference will be that Pull Request will not publish the built documentation page, due to the constraint we set in last step.
You can view your actions progress in Actions tab in your repository. You can click on the workflow result name to check the progress.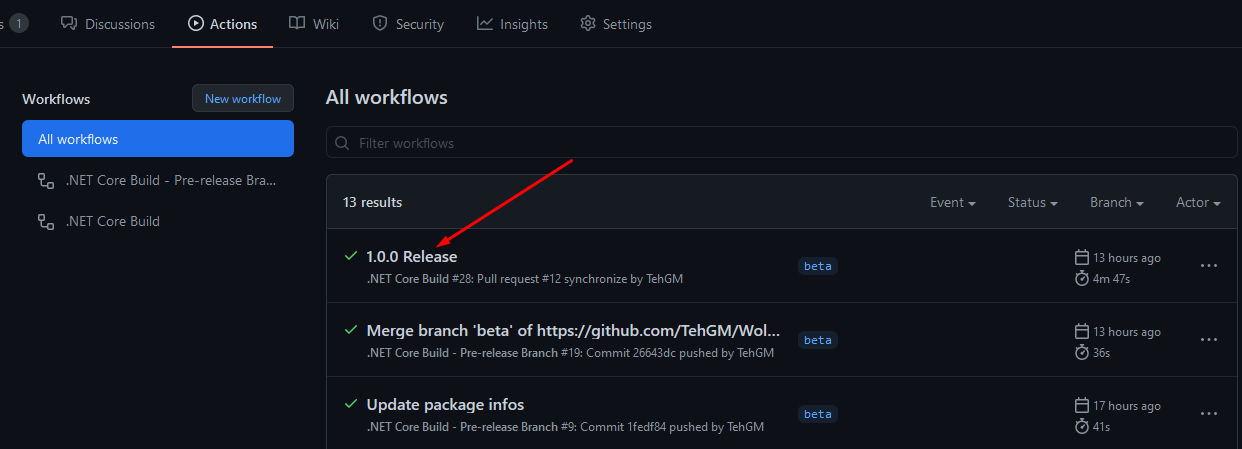
You can view steps and their output as it goes. If your action skips publishing due to it not being a push to master, Publish step will have a skipped symbol: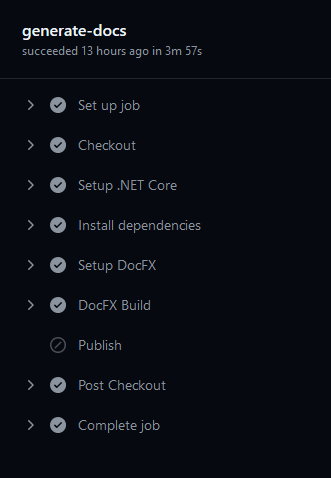
Viewing the documentation
Once all steps finish successfuly, if Publishing wasn’t skipped, you should see your documentation on your-gh-username.github.io/repository-name.
If you set custom CNAME in Publish step, your website will be seen at that domain. For example, if your CNAME is set to my.domain.com, instead of your-gh-username.github.io/repository-name, your documentation will be viewable under my.domain.com.
View GitHub Docs for more information on using custom domains on GitHub Pages.
Summary
You should now know how to automate your DocFX documentation publishing with GitHub Pages. It’s a great way to reduce that manual step for all your future development and all documentation changes - you can focus on coding and writing guides instead!
Of course, both GitHub Actions and GitHub Pages can be used for a wide variety of other use cases as well - don’t stop exploring!